How to REALLY delete an Azure Active Directory B2C tenant

You probably landed here after feeling a little of the pain inherent in attempting to delete an Azure Active Directory B2C tenant. I have read several FAQ’s, How To’s, posts, and forum pleadings on the topic and I’ve yet to find one that definitively helped me remove above 20+ test B2C tenants clogging my menu in the Azure portal.  They all seem to be missing one or more critical steps needed to fully delete a B2C tenant.

Last week, I snapped and decided I was going to make it happen and I was able to hijack about 2 hours of a colleague’s evening (thanks Ken!) as we plowed through my removing of all of the long-ago needed B2C tenants attached to my Azure subscription.

From that pain, I’ve assembled what I hope is the definitive guide to removing these pesky B2C tenants when you are done with them. If you hit additional issues, please let me know about them in the comments and I’ll try to keep this post updated.

Delete All the Things

    1. Login to your Azure AD B2C Tenant

    2. Navigate to the B2C settings by typing “b2c” in the main search box in the Azure portal and select the Azure AD B2C link under Services.

    image

    3.  Navigate to Applications, Identity Providers, and All Policies and delete all entries under each of them.

    image

    4. Navigate to Azure Active Directory / All Users and then delete each of the users (except the one you are logged in as).

    image

    5. Navigate to Azure Active Directory / App Registrations and make sure to select All apps from the dropdown (the default selection is ‘My Apps’ which hides the app we want to delete).

    image

    6. Select the b2c-extensions-app App and then click Delete and confirm the deletion when prompted.

    image

    7. Navigate to Azure Active Directory / Overview and click the Delete Directory button.

    image

    8.  Here you will be prompted with a list of things that must be resolved before you can delete the directory.

    image

    9.  To resolve the Microsoft Azure entry that appears in the Resource column, click the link.  Then, change the permissions to Yes in the Properties blade and click Save.

    image

    10. Once Azure is complete with that operation, click the Refresh button and the issues should all be resolved allowing you to now click the Delete button to delete the directory.

    image

Required Actions still listed for Enterprise Applications

If you are still seeing issues for Enterprise Applications, the culprit is likely VSTS. The issue is that sign-ons are still allowed for the VSTS Enterprise Application, so you have to turn this off.

image
image

Navigate to the Properties blade and set the Enabled users for sign-in switch to No and then click Save.

image

Back on the Overview tab, the Delete button is still disabled.  However, if you repeat Step 10 above you should now have the Required Action column empty for Enterprise applications and should be able to delete the directory now.

Wrapping Up

Hopefully this post will help clean out all of those old Azure B2C tenants you have lying around.  Please let me know if you encounter any issues with this and I’ll get this post updated with any workarounds or additional knowledge.

Originally published: 2018/08/20

Posted in Azure, Azure Active Directory B2C, Microsoft Azure | Comments Off

Using Azure Active Directory to Add World-Class Security in Under an Hour

Thanks to all that made it out to the Azure in the ATL meetup last night and thanks to Microsoft and Agile Thought for sponsoring the event and to John Garland for leading the group. 

Here are the slides from last night:  Using Azure Active Directory to Add World-Class Security in Under an Hour

For the demos, I used this Starter Project from Microsoft:  https://github.com/Azure-Samples/active-directory-b2c-dotnetcore-webapp

Originally published: 2018/08/28

Posted in Azure, Azure Active Directory B2C, Microsoft Azure | Comments Off

Where Oh Where Did My Response.SignOut Go in ASP.NET v.Next beta 6?

If you’ve just fought through an update from ASP.NET v.Next beta whatever to beta 6 and now you’re staring down the last few red squiggled lines only to come across this little gem about SignOut no longer existing, I can help you get back to signing out in just a few steps.


image


AuthenticationManager

In this beta, it appears that the sign out functionality has been moved into AuthenticationManager.  Luckily, you have one of these already attached to your Context in the form of Context.Authentication.  So, the first thing you’ll need to do is replace your calls to Context.Response.SignOut() to instead call Context.Authentication.SignOutAsync().  You’ll want to also make the appropriate updates for async and such.  My original example above then becomes this instead:


Sign Out – but not really
  1. [HttpGet]
  2. public async Task<IActionResult> LogOff()
  3. {
  4.     if (Context.User.Identity.IsAuthenticated)
  5.     {
  6.         var authority = String.Format(_config.Get(“AzureAd:AadInstance”), _config.Get(“AzureAd:Tenant”));
  7.         var authContext = new AuthenticationContext(authority, new TokenCache());
  8.         authContext.TokenCache.Clear();
  9.         await Context.Authentication.SignOutAsync(OpenIdConnectAuthenticationDefaults.AuthenticationScheme);
  10.         await Context.Authentication.SignOutAsync(CookieAuthenticationDefaults.AuthenticationType);
  11.     }
  12.     return RedirectToAction(“Index”, “Home”);
  13. }


This gets you past the compiler and, if you run the above, you’ll find that it doesn’t give you any errors at runtime.  But, it also doesn’t log you out.  In fact, it does the opposite of that…it just drops you on your home page still logged in. This is NOT a feature!

What Now – I Just Want to Sign Out?

I killed several hours trying all manner of crazy chants and incantations to make this work again, but nothing seemed to work. I always ended up right back on my home page with all my rights intact.  I finally gave in and asked on Stack Overflow and Hao Kung, a developer on the ASP.NET team, pointed me in the direction of a similar issue that he resolved for another developer and that solution worked for me!  I should have known that it would end up being a timing issue based on the level of effort I poured into it with no reward the previous night.  In the end, it turns out that the trick is to remove the Redirect and simply return void.  As Hao explains, prior to this beta the call to SignOut was not async and it won the race and pre-empted the Redirect.  Now that SignOut (renamed SignOutAsync) is async, it does not win the race and the Redirect happens instead of the SignOut.

The final method corrected for beta 6 (that actually does log the user out) then simply becomes this:


Sign Out
  1. [HttpGet]
  2. public async Task LogOff()
  3. {
  4.     if (Context.User.Identity.IsAuthenticated)
  5.     {
  6.         var authority = String.Format(_config.Get(“AzureAd:AadInstance”), _config.Get(“AzureAd:Tenant”));
  7.         var authContext = new AuthenticationContext(authority, new TokenCache());
  8.         authContext.TokenCache.Clear();
  9.         await Context.Authentication.SignOutAsync(OpenIdConnectAuthenticationDefaults.AuthenticationScheme);
  10.         await Context.Authentication.SignOutAsync(CookieAuthenticationDefaults.AuthenticationType);
  11.     }
  12. }


That’s What Makes New Bits Fun

We’ve been rewriting our internal time and attendance system using vNext and Angular and we’re enjoying the challenge of the new paradigms and the usual bleeding-edge alpha and beta bumps of new bits and this time around we even get to look around in the baker’s source code while they bake it!  We’re excited about this tighter integration of open source tools with many of the Microsoft tools and platforms we’ve been working with and helping teams with for years, but it’s definitely a bit tough to get your head around at first.
 

Originally published: 2015/07/28

Posted in ASP.NET | Comments Off

Azure Bits #4 – Adding the Azure Web Job

This post’s main objective was originally about completing the initial skeleton of uploading an image from a web page and generating a thumbnail from an Azure Web Job using Azure Blob Storage and Azure Queues, but it turned into a pretty large refactoring in anticipation of having something a bit more realistic to eventually post to GitHub.  So, I’ll devote the first part of the post to a brief review of the most significant changes and then introduce the Azure Web Job into the mix and finally, I’ll retrieve the message from the Azure Queue and show its name in the console.  I’ll then devote Azure Bit #5 to processing the original image and generating a thumbnail to complete the initial skeleton of our Image Manipulator application.

Changing the Serialization Strategy

I’m not sure why I originally chose to go with serializing my UploadedImage to a ByteArray before inserting it into the Azure Queue, but I’ve now simplified things a bit and switched over to serializing my UploadedImage as JSON.  This allows me to drop the ByteArray extension methods that I previously added to the project and it buys me some nice auto-hydration of my UploadedImage later when my processing function is called in the Azure Web Job.  Revisiting the AddMessageToQueueAsync method in my QueueService, we now convert the UploadedImage to JSON instead of a ByteArray.  Note that you’ll need to include the Newtonsoft.JSON Nuget package for the JSON serialization if it’s not already present in your web project.


QueueService.cs
  1. public async Task AddMessageToQueueAsync(string messageId, T messageObject)
  2. {
  3.     var queue = GetQueue();
  4.     // Convert to JSON
  5.     var jsonMessage = JsonConvert.SerializeObject(messageObject);
  6.     // Create the actual queue message
  7.     CloudQueueMessage message = new CloudQueueMessage(jsonMessage);
  8.     // Add the message to the queue
  9.     await queue.AddMessageAsync(message);
  10. }


In addition, I can revert the Data property in my UploadedImage class to an Auto Property since I no longer need to bother with the [NonSerialized] attribute.  I can also remove the [Serialized] attributes from my models.  Instead, I will place a [JsonIgnore] attribute on my Data property and it will be skipped in the JSON serialization process.  I’ve also removed the previous hard-coded inclusion of one thumbnail from my constructor for UploadedImage. My models now look like this:

UploadedImage.cs
  1. public class UploadedImage
  2. {
  3.     public UploadedImage()
  4.     {
  5.         Thumbnails = new List<Thumbnail>();
  6.     }
  7.     public string Name { get; set; }
  8.     public string ContentType { get; set; }
  9.     [JsonIgnore]
  10.     public byte[] Data { get; set; }
  11.     public string Url { get; set; }
  12.     public List<Thumbnail> Thumbnails { get; set; }
  13. }


Thumbnail.cs
  1. public class Thumbnail
  2. {
  3.     public int Width { get; set; }
  4.     public int Height { get; set; }
  5.     public string Url { get; set; }
  6.     public string Name { get; set; }
  7. }


Adding Dependency Injection

I had planned to get through this Azure Bits series without Dependency Injection, but I decided I missed it and didn’t want to promote the practice of new-ing up the dependencies directly.  So, I’ve added Ninject to the solution and replaced all direct instantiation of my dependencies.  It’s super easy to add Ninject via Nuget and there’s even a Ninject.MVC5 package available to get you started on wiring the dependencies.  This package will insert a configuration file for Ninject in your App_Start directory.  The important changes I needed to make to the default Ninject configuration file were to the RegisterServices method, where the actual wiring of the dependencies takes place.  You can see that I am also injecting the appSettings and connectionString into my dependencies allowing me to mock these more easily for unit tests.

NinjectConfig.cs
  1. private static void RegisterServices(IKernel kernel)
  2. {
  3.     kernel.Bind<IImageService>().To<ImageService>()
  4.         .WithConstructorArgument(“containerName”, ConfigurationManager.AppSettings["ImagesContainer"])
  5.         .WithConstructorArgument(“imageRootPath”, ConfigurationManager.AppSettings["ImageRootPath"])
  6.         .WithConstructorArgument(“connectionString”, ConfigurationManager.ConnectionStrings["BlobStorageConnectionString"].ConnectionString);
  7.     kernel.Bind<IQueueService<UploadedImage>>().To<QueueService<UploadedImage>>()
  8.         .WithConstructorArgument(“queueName”, ConfigurationManager.AppSettings["ImagesQueue"])
  9.         .WithConstructorArgument(“connectionString”, ConfigurationManager.ConnectionStrings["BlobStorageConnectionString"].ConnectionString);
  10. }


With Ninject now in place, we add a constructor to HomeController so we can inject the dependencies via Constructor Injection.  Also, I moved the creation of the default thumbnail to the controller for now.  Other than these changes, the HomeController remains unchanged.


HomeController.cs
  1. public class HomeController : Controller
  2. {
  3.     private readonly IImageService _imageService;
  4.     private readonly IQueueService<UploadedImage> _queueService;
  5.     public HomeController(IImageService imageService,  IQueueService<UploadedImage> queueService)
  6.     {
  7.         _imageService = imageService;
  8.         _queueService = queueService;
  9.     }
  10.     public ActionResult Index()
  11.     {
  12.         return View(new UploadedImage());
  13.     }
  14.     [HttpPost]
  15.     public async Task<ActionResult> Upload(FormCollection formCollection)
  16.     {
  17.         var model = new UploadedImage();
  18.         if (Request != null)
  19.         {
  20.             HttpPostedFileBase file = Request.Files["uploadedFile"];
  21.             model = await _imageService.CreateUploadedImage(file);
  22.             // hard-coded adding one thumbnail for now
  23.             model.Thumbnails.Add(new Thumbnail { Width = 200, Height = 300 });
  24.             await _imageService.AddImageToBlobStorageAsync(model);
  25.             await _queueService.AddMessageToQueueAsync(model.Name, model);
  26.         }
  27.         return View(“Index”, model);
  28.     }
  29. }


New Format For The Message in Azure Queue


After making these changes, you should be able to run the application and upload an image to Azure Blog Storage and the new JSON version of your UploadedImage object should be sitting in the Azure Queue as a message waiting to be picked up by your Azure Web Job. Taking a peek at the images message queue confirms that this is indeed the case:

image


Creating the Azure Web Job

After that quick refactoring detour, we are now ready to get on with the business of creating our Azure Web Job which will monitor our Azure Queue for UploadedImage messages and will automatically kick off the processing of thumbnails any time a new UploadedImage is added to the Queue.  There is a nice Azure Web Job project type available in Visual Studio. Simply right-click the solution and choose Add a New Project and look under the Cloud folder for the Azure Web Job project.


image

This will create a console application with a few hooks in place for the Azure Web Job.  You’ll first see the standard Program.cs.  Here there will be some default code in the Main method that will create the JobHost and then run it.  This default code assumes that you have connection strings in place either in Azure or in your app.config that are named explicitly as AzureWebJobsDashboard and AzureWebJobsStorage.  If it can’t find these connection strings based on the default implementation of the Main method, you’ll get errors.  There is an overloaded constructor for JobHost that takes an instance of JobHostConfiguration that allows more control over the connection strings and other configuration information for this Web Job.  I prefer to explicitly set the connection strings and then I can name them whatever I want.  So, my Main method looks like this:


Web Job – Program.cs
  1. public static void Main()
  2. {
  3.     var connectionString = ConfigurationManager.ConnectionStrings["BlobStorageConnectionString"].ConnectionString;
  4.     var config = new JobHostConfiguration
  5.     {
  6.         DashboardConnectionString = connectionString,
  7.         StorageConnectionString = connectionString
  8.     };
  9.     var host = new JobHost(config);
  10.     host.RunAndBlock();
  11. }


The other important file that gets created by the Azure Web Jobs template is the functions.cs file.  This is the file that contains the function (or functions) that listen to specific Azure queues and are called when new messages are added.  There is only function added in the default implementation. I am going to replace the parameters with ones more appropriate for our task at hand.  You’ll notice that the first parameter in my implementation is an UploadedImage and you’ll note that the parameter is marked with a [QueueTrigger(“images”)] attribute.  This is what tells Azure to call this method when the Queue named “images” enqueues a new message.

Moving to the second parameter, originalImageStream…  this parameter is marked with the [Blob(“images/{Name}”)] attribute.  If you recall, the UploadedImage class has a Name property that contains the name of the original image that we inserted into Azure Blob Storage.  When ProcessQueueMessageAsync is called, Azure hydrates the first parameter, UploadedImage, from the JSON message we inserted into the Queue and then it looks at the Name property (or whatever property we specify in the braces of our Blob attribute).   With this Blob attribute, we are telling Azure to go to my container named “images” and get the image that matches the uploadedImage.Name property and then deliver this to me as a stream in my processing method.  This is very helpful as the first thing you’d want to do without this automatic delivery of the source stream is go to Azure Blob Storage and fetch it.  This is what my ProcessQueueMessageAsync method looks like now.


Functions.cs
  1. public class Functions
  2. {
  3.     // This function will get triggered/executed when a new message is written
  4.     // to an Azure Queue called “images”.
  5.     //      Parameters:  
  6.     //          uploadedImage – automatically hydrated from Azure Queue where we placed the message as JSON object
  7.     //          originalImageStream – takes the Name property from uploadedImage and grabs image from blob storage
  8.     public async static void ProcessQueueMessageAsync(
  9.         [QueueTrigger("images")] UploadedImage uploadedImage,
  10.         [Blob("images/{Name}", FileAccess.Read)] Stream originalImageStream)
  11.     {
  12.         Console.WriteLine(“Processing image: “ + uploadedImage.Name);
  13.     }
  14. }


Testing the Azure Web Job

If you right-click your Web Job project and choose Publish as Azure Web Job, your Web Job should get published to your Azure Web Site.  You can double-check that in the Azure Portal by going to Web Apps and selecting Web Jobs.


image


Ideally, you would want your Web Job running continuously so that it would be called automatically when a new image is added, but depending on the type of Azure account that you have, you may not have the ability to run your Web Job continuously.  However, you can still test it by right-clicking the project in the Solution Explorer and choosing Debug > Start New Instance.  Assuming you have a message in your queue, you should see something similar to the below and you should see that the message is now removed from your Azure Queue.


image


Pausing for Now


Now that we are successfully fetching our UploadedImage message  and our original image, we just need to process the received image file into the thumbnail image(s) specified in our UploadedImage.Thumbnails collection.  In the next Azure Bit, I’ll introduce an ImageProcessor and add the functionality to generate a thumbnail and save it to Azure Blob Storage.  If you missed the other posts in this series, you can start with Azure Bits #1 – Up and Running.

Originally published: 2015/07/24

Posted in Azure, Microsoft Azure | Comments Off

Azure Bits #3 – Adding a Message to an Azure Queue

In Azure Bits #2 – Saving the Image to Azure Blob Storage, we were able to save our image to Azure Blob Storage and verify that this all went according to plan after re-publishing our site to Azure.

In this Azure Bit, we will take a look at the Azure Queue service and we will place a message in the queue to signal that our newly-uploaded image is ready to be processed.

The first thing we will need to do is to create our IQueueService/QueueService to abstract the interaction with the Azure Queue service.  We’ll just need one method for now.


IQueueService.cs
  1. public interface IQueueService<T> where T: new()
  2. {
  3.     Task AddMessageToQueueAsync(string messageId, T messageObject);
  4. }

We’ll need to know the queue name for our Azure Queue and we’ll need the Blob Storage Connection string, so I’ll go ahead and add the ImagesQueue name to our appSettings in web.config.

web.config – appSettings
  1. <appSettings>
  2.   <add key=ImageRootPath value=https://imagemanipulator3.blob.core.windows.net/images />
  3.   <add key=ImagesContainer value=images />
  4.   <add key=ImagesQueue value=images />
  5. </appSettings>


Finally, here’s the initial skeleton of QueueService.  You’ll  see that I went ahead and fetched the connection string and queue name in the constructor of QueueService.


QueueService.cs
  1. public class QueueService<T> : IQueueService<T> where T : class, new()
  2. {
  3.     private readonly string _connectionString;
  4.     private readonly string _queueName;
  5.     public QueueService()
  6.     {
  7.         _connectionString = ConfigurationManager.ConnectionStrings["BlobStorageConnectionString"].ConnectionString;
  8.         _queueName = ConfigurationManager.AppSettings["ImagesQueue"];;
  9.     }
  10.     public Task AddMessageToQueueAsync(string messageId, T messageObject)
  11.     {
  12.         // empty for now
  13.     }
  14. }


Wiring the Controller

Now, let’s jump into our HomeController and call the IQueueService’s method to add the message to the queue.  We’ll first need a concrete implementation of IQueueService. Here again for sake of demo, I am just creating a QueueService directly and skipping Dependency Injection.

HomeController.cs
  1. public class HomeController : Controller
  2. {
  3.     private readonly IImageService _imageService = new ImageService();
  4.     private readonly IQueueService<UploadedImage> _queueService = new QueueService<UploadedImage>();
  5.     public ActionResult Index()
  6.     {
  7.         return View(new UploadedImage());
  8.     }
  9.     [HttpPost]
  10.     public async Task<ActionResult> Upload(FormCollection formCollection)
  11.     {
  12.         var model = new UploadedImage();
  13.         if (Request != null)
  14.         {
  15.             HttpPostedFileBase file = Request.Files["uploadedFile"];
  16.             model = await _imageService.CreateUploadedImage(file);
  17.             await _imageService.AddImageToBlobStorageAsync(model);
  18.             await _queueService.AddMessageToQueueAsync(model.Name, model);
  19.         }
  20.         return View(“Index”, model);
  21.     }
  22. }


Serializing the Message for the Queue

One important thing to note is that messages that are posted to Azure Queue service have a maximum size of 65k.  If you recall from the first Azure Bit, I mentioned that we would use the UploadedImage class as the payload of our Azure Queue message.  However, if we just push the UploadedImage directly to the Azure queue, we will get an Exception since the Data property will almost always exceed 65k as it contains a full byte array copy of the image.  We do not even need that copy of the image in our Queue message.  The UploadedImage class contains the Url where the image is stored in Azure and that’s all we need to get our original image for processing.  There are numerous ways we could deal with this Data property, such as using a separate object to upload to the queue that didn’t have this property, removing/replacing the byte array before saving, etc.  What I have chosen to do instead is simply indicate that the Data property should not be serialized by replacing the Auto property we had for Data with an explicit property and backing field and then adding the [NonSerialized] attribute to the backing field to indicate that we do not want this data to be included in the serialization process.  You’ll also need to add the [Serialized] attribute to the UploadedImage and Thumbnail classes as we will ultimately be posting the UploadedImage to the queue service in the form of a byte array which we will serialize shortly.

UploadedFile.cs
  1. [Serializable]
  2. public class UploadedImage
  3. {
  4.     public UploadedImage()
  5.     {
  6.         // hard-coded to a single thumbnail at 200 x 300 for now
  7.         Thumbnails = new List<Thumbnail> { new Thumbnail { Width = 200, Height = 300 } };
  8.     }
  9.     public string Name { get; set; }
  10.     public string ContentType { get; set; }
  11.     // no need to serialize the file bytes of the image to the queue (will be larger than 65k max)
  12.     [NonSerialized]
  13.     private byte[] _data;
  14.     public byte[] Data
  15.     {
  16.         get { return _data; }
  17.         set { _data = value; }
  18.     }
  19.     public string Url { get; set; }
  20.     public List<Thumbnail> Thumbnails { get; set; }
  21. }


Thumbnail.cs
  1. [Serializable]
  2. public class Thumbnail
  3. {
  4.     public int Width { get; set; }
  5.     public int Height { get; set; }
  6.     public string Url { get; set; }
  7. }


Adding the Message to the Queue

Now that we have the outer plumbing in place to insert the UploadedImage into the Azure queue, let’s revisit the AddMessageToQueueAsync method on QueueService where the actual interaction with the Azure queue takes place.  First, we get the queue via a private GetQueue method (more on that below).  Then, we serialize the object that will be the payload of our Azure message (in our case, the UploadedImage).  Finally, we create the actual message for the queue and call AddMessageAsync to insert it into our Azure queue.  The private GetQueue method of QueueService bears some explanation.  To get access to a queue or to create one, you first have to access your storage account and use that to create a CloudQueueClient and then finally, you can use the queueClient to get a reference to a specific queue by name.  Additionally, you can request that the queue be created if it does not already exist by calling the queue.CreateIfNotExists method as I have done here.


QueueService.cs
  1. public Task AddMessageToQueueAsync(string messageId, T messageObject)
  2. {
  3.     var queue = GetQueue();
  4.     // serialize the payload for the message
  5.     var serializedMessage = messageObject.SerializeToByteArray();
  6.     // Create the actual queue message
  7.     CloudQueueMessage message = new CloudQueueMessage(serializedMessage);
  8.     // Add the message to the queue
  9.     return queue.AddMessageAsync(message);
  10. }
  11. private CloudQueue GetQueue()
  12. {
  13.     // get the storage account
  14.     CloudStorageAccount storageAccount = CloudStorageAccount.Parse(_connectionString);
  15.     // create the queue client
  16.     CloudQueueClient queueClient = storageAccount.CreateCloudQueueClient();
  17.     // get a reference to the queue
  18.     CloudQueue queue = queueClient.GetQueueReference(_queueName);
  19.     // create the queue if it does not exist
  20.     queue.CreateIfNotExists();
  21.     return queue;
  22. }


Extension Method for ByteArray

If you tried to compile now, you’d find that the SerializeToByteArray method does not exist.  This is an extension method that I added, along with a complementary Deserialize method, to a static ByteArrayExtensions class.  We’ll use the Deserialize method in Azure Bit #4 when we read the message from the queue and need to re-hydrate it as our UploadedImage.

ByteArrayExtensions.cs
  1. public static class ByteArrayExtensions
  2. {
  3.     public static byte[] SerializeToByteArray(this object obj)
  4.     {
  5.         if (obj == null)
  6.         {
  7.             return null;
  8.         }
  9.         var bf = new BinaryFormatter();
  10.         using (var ms = new MemoryStream())
  11.         {
  12.             bf.Serialize(ms, obj);
  13.             return ms.ToArray();
  14.         }
  15.     }
  16.     public static T Deserialize<T>(this byte[] byteArray) where T : class
  17.     {
  18.         if (byteArray == null)
  19.         {
  20.             return null;
  21.         }
  22.         using (var memStream = new MemoryStream())
  23.         {
  24.             var binForm = new BinaryFormatter();
  25.             memStream.Write(byteArray, 0, byteArray.Length);
  26.             memStream.Seek(0, SeekOrigin.Begin);
  27.             var obj = (T)binForm.Deserialize(memStream);
  28.             return obj;
  29.         }
  30.     }
  31. }


The Final Result – Message in the Queue

At this point, you should be able to run the application and select an image which gets uploaded to Azure Blob Storage and you should have a message sitting in your Azure queue telling you that the image is uploaded and waiting for processing.  There are a couple of ways to view what’s in your queue without having to actually fetch it.  As of this writing, Azure Storage Explorer seems to have issues with byte array messages and just gives errors when I try to view them there.  Probably the most convenient place to get a quick look into whether my message made it or not is via the Server Explorer directly in Visual Studio.

image


You can see here that my message was inserted into the queue.  Additionally, you can view the contents of your Blobs in Server Explorer to verify that the image itself is in Azure Blob Storage. Go ahead and publish your latest to Azure by right-clicking on the web project in Solution Explorer and choosing “Publish..”.

In Azure Bit #4 – Adding the Azure Web Job, we will create an Azure Web Job that pulls our message from the queue and gets it ready for processing.

Did you miss the first Azure Bit?  You can start the series for Azure Bits here: Azure Bits #1 – Up and Running at the Wintellect DevCenter.

Originally published: 2015/06/16

Posted in Azure, Microsoft Azure | Comments Off

Azure Bits #2 – Saving the Image to Azure Blob Storage

Creating the Azure Storage Account

In Azure Bits #1 – Up and Running, we got a skeleton in place for our web application that will allow the user to upload an image and we published our Azure Image Manipulator Web App to Azure.  Our next task is taking this uploaded image and saving it into Azure Blob Storage.

The first thing we need to do is to create an Azure Storage account in the Azure Portal.  Once logged into the Portal, you’ll want to click on the big green plus sign for New in the top left.

image

Next, you’ll want to select Data + Storage and then Storage to get to the configuration blade for your new storage account.

image

Here, you’ll want to enter a unique name for your Azure Storage account. Note that this name must be globally unique and must be a valid URL. You’ll also want to make sure that the physical location you select is closest to the consumers of your data as costs can increase based on the proximity of the consumer to the storage region. You can leave the rest of the information with the defaults and then click the Create button.  Azure will grind away for a bit to create your storage account as you watch an animation on your home screen. There’s a much more in-depth article specifically on Azure Storage Accounts at the Azure site that you may find interesting, though don’t be alarmed that the screenshots there differ from what I have here or what you might actually encounter on the Azure Portal itself. The Azure folks have been tweaking the look of the Azure Preview Portal pretty regularly.

Eventually, the Azure Storage account will be created and you will be presented with the dashboard page for your new storage account.


Adding the Container

In Azure Blob Storage, each blob must live inside a Container.  A Container is just a way to group blobs and is used as part of the URL that is created for each blob.  An Azure Storage account can contain unlimited Containers and each Container can contain unlimited blobs.

So, let’s add a Container so we’ll have somewhere to store our images.  In the Summary area, you want to now click on the Containers link to show your containers for this storage account and then click the white plus icon just below the Containers header.

image

In the Add a Container blade, enter a name for your container and select Blob and click OK.

image

Once your container is created, it will be displayed in the list of containers.  Copy the URL that is created for your container from the URL column.  Let’s go ahead and copy that into our web.config file as we’ll soon need it.

image

Configuration Settings

Open the Visual Studio solution we created in the last Azure Bit so we can wire up saving of our UploadedImage into our newly created Azure Storage account.

While you’ve still got that URL in your clipboard, let’s paste that into the appSettings of our web.config file as ImageRootPath.  Also, go ahead and add an appSetting for your Container name as we will need that as well.


web.config
  1. <appSettings>
  2.   <add key=ImageRootPath value=https://imagemanipulator.blob.core.windows.net/images />
  3.   <add key=ImagesContainer value=images />
  4. </appSettings>


Since we already have web.config open, let’s go ahead and grab the connection string for our storage account and add that to our connectionStrings in web.config.  In the main dashboard for your storage account, you’ll want to click the All Settings link and then select Keys so that you can see the various key settings for your storage account including the connection strings.  You should be seeing something that looks roughly like the below.  Note that I’ve masked some of my super secret keys in this screenshot.  It’s very important that you guard your keys as they can be used to gain unfettered access to your storage accounts if they are compromised.  You can always regenerate new keys by using the buttons just under the Manage keys header in the Azure Portal if you find that your keys have been compromised.  Also, there are various rotation strategies you can employ to automate the exchanging of primary and secondary keys, but that is beyond the scope of this series.


image


Now copy the value given for Primary Connection String and add this to the connectionStrings section of web.config:


web.config
  1. <connectionStrings>
  2.   <add name=BlobStorageConnectionString
  3.         connectionString=DefaultEndpointsProtocol=https;AccountName=imagemanipulator;AccountKey=XXXXXXXXXXXXX />
  4. </connectionStrings>


Next, we’ll update ImageService to grab the values we just placed in web.config and assign these to private fields in ImageService.  In addition, now that we have these values, we can construct and assign the URL for our UploadedImage in the CreateUploadedImage method.


ImageService.cs
  1. public class ImageService : IImageService
  2. {
  3.     private readonly string _imageRootPath;
  4.     private readonly string _containerName;
  5.     private readonly string _blobStorageConnectionString;
  6.     public ImageService()
  7.     {
  8.         _imageRootPath = ConfigurationManager.AppSettings["ImageRootPath"];
  9.         _containerName = ConfigurationManager.AppSettings["ImagesContainer"];
  10.         _blobStorageConnectionString = ConfigurationManager.ConnectionStrings["BlobStorageConnectionString"].ConnectionString;
  11.     }
  12.     public async Task<UploadedImage> CreateUploadedImage(HttpPostedFileBase file)
  13.     {
  14.         if ((file != null) && (file.ContentLength > 0) && !string.IsNullOrEmpty(file.FileName))
  15.         {
  16.             byte[] fileBytes = new byte[file.ContentLength];
  17.             await file.InputStream.ReadAsync(fileBytes, 0, Convert.ToInt32(file.ContentLength));
  18.             return new UploadedImage
  19.             {
  20.                 ContentType = file.ContentType,
  21.                 Data = fileBytes,
  22.                 Name = file.FileName,
  23.                 Url = string.Format(“{0}/{1}, _imageRootPath, file.FileName)
  24.             };
  25.         }
  26.         return null;
  27.     }
  28. }

Wiring the Image Service to Upload

For this next section, we will need to bring in some additional packages via Nuget.  To do this, right-click on the web project and select Manage NuGet Packages and then search for WindowsAzure.Storage and click Install.  This will bring in all of the required Nuget packages needed for interaction with Azure Storage, so be sure to click “I Accept” when prompted.

The flow for saving our image to Azure Blob Storage is that we first need to get a reference to our Storage Account and use that to create a reference to our Container.  Once we have our Container, we configure it to allow public access and we use it to get a reference to a block of memory for our blob.  Lastly, we tell the block that we are about to insert an image and finally we kick off the upload of the image to our Container using the name we generated earlier.  Let’s now see what that looks like in some (heavily-commented) code.

First, add the new method to the IImageService interface:


IImageService.cs
  1. public interface IImageService
  2. {
  3.     Task<UploadedImage> CreateUploadedImage(HttpPostedFileBase file);
  4.     Task AddImageToBlobStorageAsync(UploadedImage image);
  5. }


And now, implement the new method in ImageService:


ImageService.cs
  1. public async Task AddImageToBlobStorageAsync(UploadedImage image)
  2. {
  3.     //  get the container reference
  4.     var container = GetImagesBlobContainer();
  5.     // using the container reference, get a block blob reference and set its type
  6.     CloudBlockBlob blockBlob = container.GetBlockBlobReference(image.Name);
  7.     blockBlob.Properties.ContentType = image.ContentType;
  8.     // finally, upload the image into blob storage using the block blob reference
  9.     var fileBytes = image.Data;
  10.     await blockBlob.UploadFromByteArrayAsync(fileBytes, 0, fileBytes.Length);
  11. }
  12. private CloudBlobContainer GetImagesBlobContainer()
  13. {
  14.     // use the connection string to get the storage account
  15.     var storageAccount = CloudStorageAccount.Parse(_blobStorageConnectionString);
  16.     // using the storage account, create the blob client
  17.     var blobClient = storageAccount.CreateCloudBlobClient();
  18.     // finally, using the blob client, get a reference to our container
  19.     var container = blobClient.GetContainerReference(_containerName);
  20.     // if we had not created the container in the portal, this would automatically create it for us at run time
  21.     container.CreateIfNotExists();
  22.     // by default, blobs are private and would require your access key to download.
  23.     //   You can allow public access to the blobs by making the container public.   
  24.     container.SetPermissions(
  25.         new BlobContainerPermissions
  26.         {
  27.             PublicAccess = BlobContainerPublicAccessType.Blob
  28.         });
  29.     return container;
  30. }


One thing to note about the public access we set on our Container (since I know that the PublicAccess = BlobContainerPublicAccessType.Blob might make some folks nervous).  Containers are created by default with private access.  We are updating our Container to public to allow read-only anonymous access of our images.  We will still need our private access keys in order to delete or edit images in the Container.

The last step for the upload process is to actually call the AddImageToBlobStorageAsync method from our HomeController’s Upload action method.


HomeController.cs
  1. [HttpPost]
  2. public async Task<ActionResult> Upload(FormCollection formCollection)
  3. {
  4.     if(Request != null)
  5.     {
  6.         HttpPostedFileBase file = Request.Files["uploadedFile"];
  7.         var uploadedImage = await _imageService.CreateUploadedImage(file);
  8.         await _imageService.AddImageToBlobStorageAsync(uploadedImage);
  9.     }
  10.     return View(“Index”);
  11. }


At this point, you should be able to run the application and upload an image and it should save to Azure Blob Storage and you should see it appear in your web page.  You can right-click on the image and choose Inspect Element or View Properties (depending on your browser) to see that the image is actually being served from your Azure Storage account.


image

Debugging with Azure Storage Explorer

Now that you have the site working and saving to Azure Blob Storage, I’ll point you to one of my favorite debugging tools that I use when I am working with Azure Storage.  There are several tools that exist for viewing and manipulating the contents of Azure Storage accounts, but my favorite is Azure Storage Explorer.  Once you install Azure Storage Explorer, you’ll want to click on the Add Account button in the top menu.  To get the values needed for the Add Storage Account dialog, you’ll want to return to the All Settings blade for your storage account in the Azure Portal.  The first two settings are the ones you want for creating a new account in Azure Storage Explorer.  Here’s the mapping:


image


Once you have the storage account configured in Azure Storage Explorer, you can view the contents of your container(s), like this:


image


You can double-click on any of the items and the View Blob dialog will open showing you the Properties Tab with everything you could possibly want to know about your blob item and even allows you to change most of the properties directly from the interface.  If you then click the Content Tab, select Image, and then click the View button you can see your image:


image

Let’s Get it to the Cloud

As a final step, we want to publish all of this new Azure Image Manipulator goodness that we’ve created in these first two Azure Bits back out to our Azure website.  You do this by right-clicking on the web project in Solution Explorer and choosing “Publish..”.  Once Visual Studio completes the publishing process, you should be able to run your Azure website and upload an image to Azure Blob Storage just the same as when you were running against localhost earlier.

Now that we have our original image safely stored away in Azure Blob Storage, we need to give notice that our image is ready for processing.  We’ll do this by placing a message in an Azure Queue.

In the next Azure Bit, I’ll walk through setting up an Azure Queue and inserting a message into the queue signaling that our image is ready for manipulation.

Did you miss the first Azure Bit?  You can read Azure Bits #1 – Up and Running at the Wintellect DevCenter.

Originally published: 2015/05/22

Posted in Azure, Microsoft Azure | Comments Off

Azure Bits #1 – Up and Running

As Steve Porter mentioned in his blog post, How Wintellect Uses Microsoft Azure, we are making pretty heavy use of many offerings in the Azure toolset for our internal and client-facing web properties here at Wintellect and have been doing so from the early days of Azure. As we continue to experiment with new and/or improved Azure offerings, I thought it might be helpful to share some of the more interesting things we’ve worked through as we explore that ever-increasing world that is Azure.

As the first sample application for these Azure Bits posts, I will create a small image manipulator example in Azure. This example will allow me to demonstrate several pieces of the Azure stack working together, including an Azure hosted web app, Azure Blob Storage, an Azure Queue, and an Azure hosted WebJob.

Azure Image Manipulator

For this first version of the Azure Image Manipulator, the user will only be able to browse and select an image from their computer and submit the image for processing. When the user submits the image, the original image will be inserted into Azure Blob Storage and a message will be placed in an Azure Queue indicating that a new image has been uploaded and needs to have a thumbnail created. In follow-up posts, I will create a WebJob that monitors the Azure Queue and when a new image message is detected, it will process the message from the queue, fetch the original image from Azure Blob Storage, and create a manipulated (thumbnail) copy and save this new image to Azure Blob Storage with a known URL.

I’m keeping it very simple for this first revision and only creating a single hard-coded thumbnail at 200 x 300 pixels.  That way, I can focus on the Azure moving parts and not get lost in how many cool options I can allow on the manipulated image. Once I have the basic pipeline in place for uploading and background processing of these images, I could add functionality such as allowing the user to drag-and-drop multiple images or upload a zip file of images. I could also allow the user to select multiple thumbnail sizes, add a watermark, generate a different image format, or any other image manipulation algorithms I wanted to offer for the resultant manipulated images. This could be very helpful for a user creating a catalog of products that need to be viewable on different devices where images need to be suitable for the particular presentation and not visually compromised by stretching or squashing a single version of the image.

Azure Account Setup and Web App Published

Before we get started developing the Azure Image Manipulator, you’ll need to create an Azure account. You can get a free one month trial of Azure at the Microsoft Azure sign up page. This takes only five minutes to accomplish and is demonstrated in the Sign up for Microsoft Azure video from Scott Hanselman.  If you’ve already got a functional Azure account, even better…you saved 5 minutes.

Next, we want to get an ASP.NET MVC web app up and running in Azure. That might sound a bit intimidating if you haven’t done it yet, but it’s not. Once more, I’ll refer you to Mr. Hanselman for a quick 3 minute video entitled Create an ASP.NET Website using Visual Studio.  In the video, he will walk you through spinning up a default ASP.NET MVC site all way to deploying your new web app to your Azure account.

I’ll assume at this point that you have a functional ASP.NET MVC web app running in Azure that we can gut and use for our own purposes.

Let’s See Some Code

The basic flow of our functionality is that we will accept the uploaded image from the user via a form POST on the HomeController. The HomeController will then package this into a class we are creating called UploadedImage. This is the model for everything we need to know about the image and the blueprint for the copies we want created. An instance of UploadedImage will later be inserted into the Azure Queue as our message to indicate that an image is ready for processing.

First, we’ll need to create a couple of model classes for UploadedImage and Thumbnail, like this:

Model classes
  1. public class UploadedImage
  2. {
  3.     public UploadedImage()
  4.     {
  5.         // hard-coded to a single thumbnail at 200 x 300 for now
  6.         Thumbnails = new List<Thumbnail> { new Thumbnail { Width = 200, Height = 300 } };
  7.     }
  8.     public string Name { get; set; }
  9.     public string ContentType { get; set; }
  10.     public byte[] Data { get; set; }
  11.     public string Url { get; set; }
  12.     public List<Thumbnail> Thumbnails { get; set; }
  13. }
  14. public class Thumbnail
  15. {
  16.     public int Width { get; set; }
  17.     public int Height { get; set; }
  18.     public string Url { get; set; }
  19. }


Next, in the default HomeController, we’ll need to add an Upload action method to handle the posting of the file to the server.  In the interest of keeping the Controller pretty lightweight, I’m going to create an ImageService to handle the image-centric logic.  I have exposed this and I refer to it in my HomeController via an interface, IImageService. However, you’ll note that I’ve skipped the Dependency Injection for this simple example and just instantiated a concrete instance of ImageService in my HomeController.  We’ll get to ImageService in just a bit.  For now, just add this to your HomeController:


HomeController.cs
  1. private readonly IImageService _imageService = new ImageService();
  2. [HttpPost]
  3. public async Task<ActionResult> Upload(FormCollection formCollection)
  4. {
  5.     var model = new UploadedImage();
  6.     if (Request != null)
  7.     {
  8.         HttpPostedFileBase file = Request.Files["uploadedFile"];
  9.         model = await _imageService.CreateUploadedImage(file);
  10.     }
  11.     return View(“Index”, model);
  12. }


Now add the ImageService and IImageService.  You’ll notice that for Url, I’ve just returned the incoming image as a base-64 encoded data url.  Once we move to storing the image in Azure Blob Storage, I’ll replace that with the building of the actual url pointing to Azure Blob Storage.


IImageService / ImageService
  1. public interface IImageService
  2. {
  3.     Task<UploadedImage> CreateUploadedImage(HttpPostedFileBase file);
  4. }
  5. public class ImageService : IImageService
  6. {
  7.     public async Task<UploadedImage> CreateUploadedImage(HttpPostedFileBase file)
  8.     {
  9.         if ((file != null) && (file.ContentLength > 0) && !string.IsNullOrEmpty(file.FileName))
  10.         {
  11.             byte[] fileBytes = new byte[file.ContentLength];
  12.             await file.InputStream.ReadAsync(fileBytes, 0, Convert.ToInt32(file.ContentLength));
  13.             return new UploadedImage
  14.             {
  15.                 ContentType = file.ContentType,
  16.                 Data = fileBytes,
  17.                 Name = file.FileName,
  18.                 // temporarily build a data url to return
  19.                 Url = String.Format(“data:image/jpeg;base64,{0}, Convert.ToBase64String(fileBytes))
  20.             };
  21.         }
  22.         return null;
  23.     }
  24. }


Finally, you can replace the contents of your HomeIndex.cshtml with this:


Index.html
  1. @model AzureBytes1.Models.UploadedImage
  2. @using (Html.BeginForm(“Upload”, “Home”, FormMethod.Post, new { enctype = “multipart/form-data” }))
  3. {
  4.     <div class=”jumbotron”>
  5.         <h3>Image Manipulator</h3>
  6.         <div>
  7.             <input name=”uploadedFile” class=”form-control” type=”file” style=”max-width: 800px; width: 500px;“/>
  8.         </div>
  9.         <button class=”btn btn-primary” type=”submit”>Upload File</button>
  10.         <div class=”well well-sm”>
  11.             <img src=”@Model.Url />
  12.         </div>
  13.     </div>
  14. }


At this point, you should be able to hit F5 and see the application run. You should be able to select an image and click the Upload button and you should see the image displayed in the page.

Publish and Wrap Up

Before I conclude this post, let’s go ahead and publish our updated web app to Azure.  It’s as easy as right-clicking on your web project in the Solution Explorer and selecting “Publish..” and then clicking the Publish button.  If you have any trouble, refer back to the second video I linked above from Scott Hanselman.  He walks through the process in that video.

In Azure Bits #2 – Saving the Image to Azure Blob Storage, I walk you through setting up an Azure Blob Storage account and a Blob Storage Container in the Azure Portal and show how to use these in ImageService to save the original image to Azure Blob Storage and to view the Azure-published image in the browser.
Originally published: 2015/05/12

Posted in Azure, Microsoft Azure | Comments Off

Windows 8 Start Menu Toggle

Since getting my hands on Windows 8 this past week, I (like many others) have really grappled with the constant accidental returning to the metro tiles every time I try to search for something in the new neutered Start Menu that appears in the Developer’s Preview of Windows 8.  To say I hate that would be an understatement. 

Today, a colleague forwarded me a link to a blog entry that showed the magic registry key to get my beloved Start Menu mostly back the way it was.  Apparently, there is a small GUI app on CodePlex that will take care of this as well. 

I decided I didn’t want to see anything, I just want to toggle.  So, I threw together a quick Console App to take care of this.  I can place this app on my desktop in Windows 8 classic mode and just toggle back and forth without having to see anything but a quick flash of the console. 

Here’s the code:

  1. using Microsoft.Win32;
  2.  
  3. namespace ToggleStartMenu
  4. {
  5.     class Program
  6.     {
  7.         static void Main(string[] args)
  8.         {
  9.             var rootKey = Registry.CurrentUser;
  10.             var subKey = rootKey.OpenSubKey(@"Software\Microsoft\Windows\CurrentVersion\Explorer",
  11.                 RegistryKeyPermissionCheck.ReadWriteSubTree, System.Security.AccessControl.RegistryRights.FullControl);
  12.  
  13.             if (subKey != null)
  14.             {
  15.                 var value = (int) subKey.GetValue("RPEnabled");
  16.                 subKey.SetValue("RPEnabled", value == 0 ? 1 : 0, RegistryValueKind.DWord);
  17.             }
  18.         }
  19.     }
  20. }


Here’s the source

Posted in Windows 8 | Comments Off

How to Scale a jQuery Mobile Site for iOS

I was recently working on a jQuery Mobile application and everything looked great on my 21” touch monitor on several browsers, but when I deployed to the server and then hit the page on my iPhone, I ran into a few issues that I needed to work through in order to make the site what I’d call usable.

The first issue was that the site wasn’t scaling properly when it first loaded and everything was so small that I could barely click on it with my finger.  Certainly, this is not what I’d call optimal for a mobile site.

image

I originally played around with increasing font-size for the body and a few other quick CSS tricks, but nothing really did the trick.  I finally came across a meta tag which seemed to fix this issue. 

  1. <meta content="width=device-width, initial-scale=1" name="viewport">

This is what it looked like after adding this meta tag.

image

However, this created a new issue.  This second issue was that when I rotated from Portrait to Landscape mode, the web page did not scale properly and my toolbar buttons were now cutoff on the right-hand side like this:

image

I found numerous references to this known issue with iOS scaling and even found a few javascript fixes available around the web.  However, after a bit of experimenting, I found that I could fix the issue with just a few tweaks to the meta tag above and using no javascript.  The final meta tag looks like this:

  1. <meta content="width=device-width, minimum-scale=1, maximum-scale=1" name="viewport">


This is what the site looks like now when it’s rotated.

image

Posted in iOS, jQuery Mobile | Comments Off

How to Include and Deploy Data using a Visual Studio Database Project

I’m a big fan of Visual Studio’s Database Project and I’ve used them successfully in several client projects.  If you are not familiar with using the Database Project, I encourage you to give it a look.  It gives me a nice warm feeling to see that the database schema and even necessary seed data is maintained in source control in the solution right along with the other projects.  For developers that need to get up and running locally, the joy of simply right-clicking and choosing “Deploy” is hard to beat.  

Most any reasonably-sized application will have lookup lists and other data that need to be there for the application to function properly. To my knowledge, there’s not really an automated way in Visual Studio to tell the Database Project that you want to bring the data into the project and have it be part of your deployment. However, there is a way to tap into the scripts that Visual Studio creates when it creates a new Database Project.

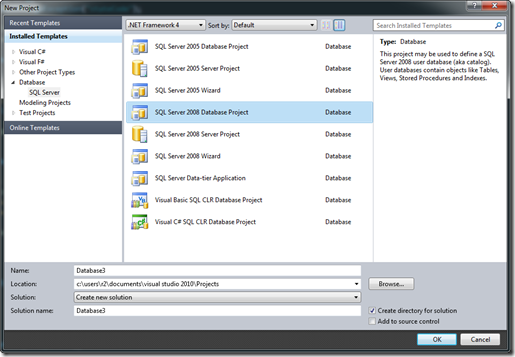
This post specifically addresses including and deploying data and is not intended as a general overview of Database projects.  There is plenty of decent material available on doing that.  To follow along with this post, you can simply add a new project in Visual Studio and choose the Database | SQL Server project type and select the SQL Server 2008 Database Project.

SNAGHTMLb6665b0

If you take a look in the Database project, you’ll see a folder called Scripts and under Scripts there are folders for both Pre-Deployment and Post-Deployment.  As we are interested in inserting data into tables, we obviously need to insert code in the Post-Deployment step when the tables actually exist. If you open the Post-Deployment folder, you’ll note a file called Script.PostDeployment.sql.  This script is run automatically after the database is deployed by the Database project.  The scripts that are created here can contain any valid SQL.  
 

image

You could place all of your post deployment INSERT statements into this Script.PostDeployment.sql file directly, but that can get ugly quickly. Instead, I like to create separate files for each table for which I want to INSERT data.  I generally name the files Data.[TableName].sql.  You can simply right-click on the Post-Deployment folder and choose Add | Script.   For instance, here I have added a Data.State.sql file that will insert all of the States into my State table after the database is deployed.  

image

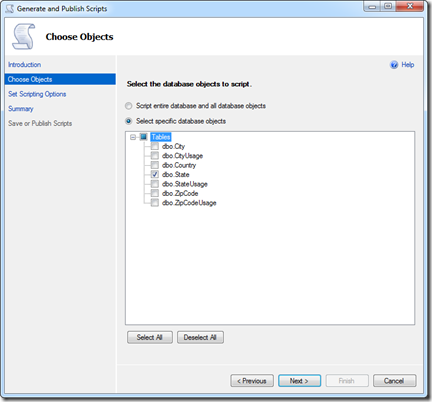
Rather than hand-type my INSERT statements, I use SQL Server Management Studio (hereafter, SSMS) and let it do the lifting for me.  In SSMS, right-click on the database name and choose Tasks | Generate Scripts.  This will launch the Generate and Publish Scripts Dialog,  Under Choose Objects, you can make the choice of which tables you want to export.  Below, I selected the State table and clicked Next which shows the Set Scripting Options page. 

SNAGHTML79edafa

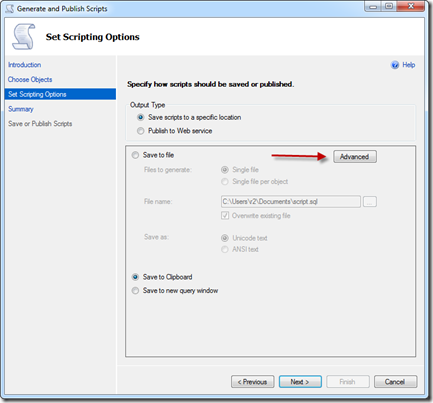
In the Set Scripting Options page, you’ll want to select where you want to export the INSERT statements.  I usually just select Clipboard and then paste that into the appropriate file in Visual Studio.  The most important part of this page is the Advanced button.  You’ll need to click this and go into the Advanced Scripting Options.

SNAGHTML7a0dc42

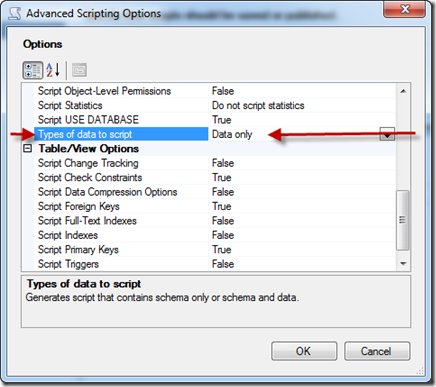
The default behavior of the Generate and Publish Scripts Dialog is to only script the schema generation and no data.  To change this to data only, you change the Types of data to script setting to “Data only”.   You can then click OK and run the export. 

SNAGHTML7a3f416

Once the Generate and Publish Scripts Dialog has completed the generation of your INSERT statements, you can paste these INSERT statements back into the sql file you created earlier in Visual Studio.  Here you see I’ve pasted these into the Data.States.sql file that I created above.

image

Now that you have the INSERT statements in your sql file, you need to tell Visual Studio to run your sql file after the deployment.  Recall that the Script.PostDeployment.sql file created by Visual Studio is automatically run after deployment.  However, custom sql files that you create are not.  If you open the default Script.PostDeployment.sql file, you’ll see comments that tell you that you can use SQLCMD syntax to include a file and even gives you an example.  Here is my Script.PostDeployment.sql file with my custom Data.State.sql file included. 

image

You’ll likely notice that there are squiggle lines and you’ll likely get a build error on the 
Script.PostDeployment.sql file.  To fix this, you’ll need to change the mode to SQLCMD.  You can do this by 
clicking the SQLCMD button in the T-SQL toolbar.  


image

You should now be able to click the Execute SQL button to test run your Script.PostDeployment.sql file.  When you are ready to deploy your schema and seed data to a new database, you can now simply right-click on your Database project and select Deploy.  Remember to update your Connection Strings as needed and you should be off and running. 

Admittedly, this is a bit more manual than I’d like but the initial creation of the scripts goes pretty fast and the fact that the seed data and data schema are part of source control makes up for it in my book. 

If anyone has a way that works better for them, I’d love to hear about it.  

Posted in Data, Visual Studio 2010 | Comments Off