I’m a big fan of Visual Studio’s Database Project and I’ve used them successfully in several client projects. If you are not familiar with using the Database Project, I encourage you to give it a look. It gives me a nice warm feeling to see that the database schema and even necessary seed data is maintained in source control in the solution right along with the other projects. For developers that need to get up and running locally, the joy of simply right-clicking and choosing “Deploy” is hard to beat.
Most any reasonably-sized application will have lookup lists and other data that need to be there for the application to function properly. To my knowledge, there’s not really an automated way in Visual Studio to tell the Database Project that you want to bring the data into the project and have it be part of your deployment. However, there is a way to tap into the scripts that Visual Studio creates when it creates a new Database Project.
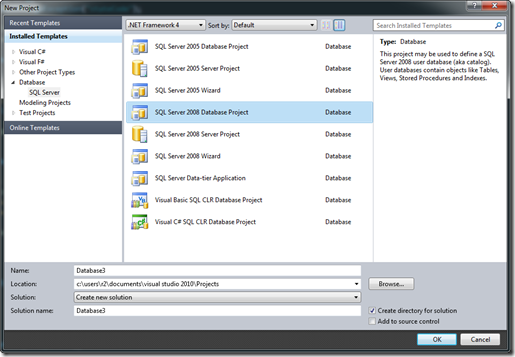
This post specifically addresses including and deploying data and is not intended as a general overview of Database projects. There is plenty of decent material available on doing that. To follow along with this post, you can simply add a new project in Visual Studio and choose the Database | SQL Server project type and select the SQL Server 2008 Database Project.
If you take a look in the Database project, you’ll see a folder called Scripts and under Scripts there are folders for both Pre-Deployment and Post-Deployment. As we are interested in inserting data into tables, we obviously need to insert code in the Post-Deployment step when the tables actually exist. If you open the Post-Deployment folder, you’ll note a file called Script.PostDeployment.sql. This script is run automatically after the database is deployed by the Database project. The scripts that are created here can contain any valid SQL.
You could place all of your post deployment INSERT statements into this Script.PostDeployment.sql file directly, but that can get ugly quickly. Instead, I like to create separate files for each table for which I want to INSERT data. I generally name the files Data.[TableName].sql. You can simply right-click on the Post-Deployment folder and choose Add | Script. For instance, here I have added a Data.State.sql file that will insert all of the States into my State table after the database is deployed.
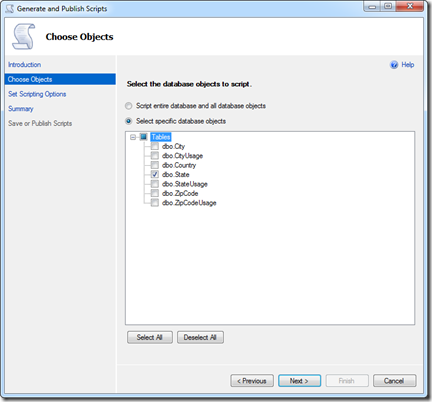
Rather than hand-type my INSERT statements, I use SQL Server Management Studio (hereafter, SSMS) and let it do the lifting for me. In SSMS, right-click on the database name and choose Tasks | Generate Scripts. This will launch the Generate and Publish Scripts Dialog, Under Choose Objects, you can make the choice of which tables you want to export. Below, I selected the State table and clicked Next which shows the Set Scripting Options page.
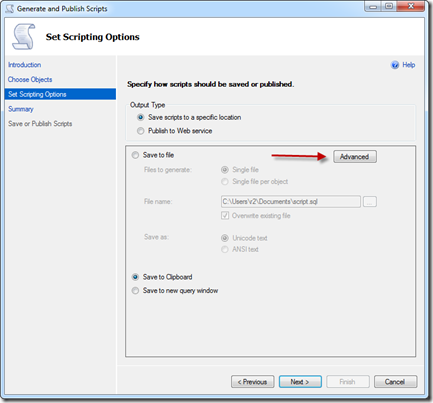
In the Set Scripting Options page, you’ll want to select where you want to export the INSERT statements. I usually just select Clipboard and then paste that into the appropriate file in Visual Studio. The most important part of this page is the Advanced button. You’ll need to click this and go into the Advanced Scripting Options.
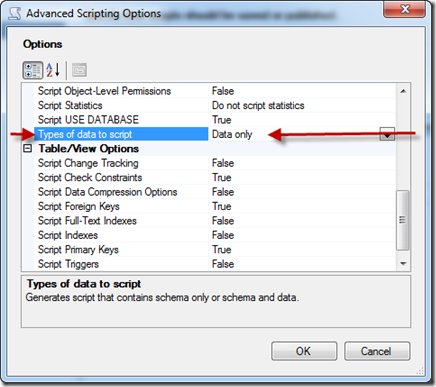
The default behavior of the Generate and Publish Scripts Dialog is to only script the schema generation and no data. To change this to data only, you change the Types of data to script setting to “Data only”. You can then click OK and run the export.
Once the Generate and Publish Scripts Dialog has completed the generation of your INSERT statements, you can paste these INSERT statements back into the sql file you created earlier in Visual Studio. Here you see I’ve pasted these into the Data.States.sql file that I created above.
Now that you have the INSERT statements in your sql file, you need to tell Visual Studio to run your sql file after the deployment. Recall that the Script.PostDeployment.sql file created by Visual Studio is automatically run after deployment. However, custom sql files that you create are not. If you open the default Script.PostDeployment.sql file, you’ll see comments that tell you that you can use SQLCMD syntax to include a file and even gives you an example. Here is my Script.PostDeployment.sql file with my custom Data.State.sql file included.
You’ll likely notice that there are squiggle lines and you’ll likely get a build error on the
Script.PostDeployment.sql file. To fix this, you’ll need to change the mode to SQLCMD. You can do this by
clicking the SQLCMD button in the T-SQL toolbar.
You should now be able to click the Execute SQL button to test run your Script.PostDeployment.sql file. When you are ready to deploy your schema and seed data to a new database, you can now simply right-click on your Database project and select Deploy. Remember to update your Connection Strings as needed and you should be off and running.
Admittedly, this is a bit more manual than I’d like but the initial creation of the scripts goes pretty fast and the fact that the seed data and data schema are part of source control makes up for it in my book.
If anyone has a way that works better for them, I’d love to hear about it.


