Silverlight UI Rant #1 – DataGrid Last Column Fill

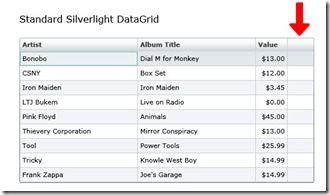
If you’ve used the the Silverlight 2 DataGrid, you’ve no doubt seen this:

silverlightDatagrid01

I really hate when this happens!  I’ve seen several forum discussions where folks were looking to get rid of this nastiness, so I know I’m not the only one losing sleep over it.  I haven’t come across a solution in anything I’ve seen and so now that I have one, I thought I’d share it.

I ran into this a few weeks back and tried most of the obvious things with defining the DataGridColumns myself rather than auto-generating them.  In these defined DataGridColumns, I tried setting the Width of the last column to "*" just like you would a standard Grid.ColumnDefinition if you wanted to have it take up the remainder of the space.  This did nothing more than invite my buddy, AG_E_PARSER_BAD_PROPERTY, to show up…again.  It appears that star-sizing isn’t yet implemented for DataGridColumn derivatives.

This morning I was finally able to grab a few minutes to dive into DataGrid and find out what I could do about this.  I decided to create an ExtendedDataGrid and add a LastColumnFill DependencyProperty similar to way the DockPanel has a LastChildFill. Most of the work is happening in this method which is called if the LastColumnFill is true:

  1. private void AdjustLastColumnWidth(Size finalSize)
  2. {
  3.     // get the Vertical ScrollBar
  4.     ScrollBar scrollBar = this.GetTemplateChild("VerticalScrollbar") as ScrollBar;
  5.  
  6.     // compute the width to allow for the scrollbar based on it's visibility.
  7.     double scrollBarWidthAllowance =
  8.         (scrollBar != null && scrollBar.Visibility == Visibility.Visible) ?
  9.         scrollBar.ActualWidth + 2 : 2;
  10.  
  11.     // compute the width of all the columns excluding the last one
  12.     var widthOfAllButLastColumn =
  13.         Columns.TakeWhile(c => c != Columns.Last() && c.Visibility == Visibility.Visible)
  14.         .Sum(c => c.ActualWidth);
  15.  
  16.     // set the last column width    
  17.     Columns.Last().Width = new DataGridLength(finalSize.Width
  18.         - widthOfAllButLastColumn – scrollBarWidthAllowance);
  19.  
  20. }

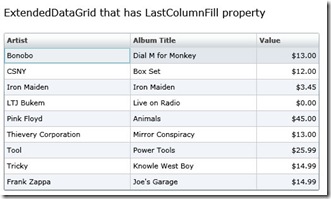
This is the result:

silverlightDatagrid02

Much better!  The live demo shows it with and without a vertical scrollbar.  Note that it also handles
auto-generated DataGridColumns if that’s your thang.

Here’s the live demo.

Here’s the code.

Posted in Silverlight, Silverlight 2, UI and Usability, UI Rant | Comments Off

HtmlPage.PopupWindow vs. HtmlWindow.Navigate

I was recently looking at various ways of launching an external window from inside a Silverlight 2 application.  Dusting off your javascript brain cell, you’ll recall that to open a popup dialog in "the old days", we’d use window.open().  I knew about the HtmlBridge available in Silverlight 2 and I had used it for several other nifty interactions between my managed code and the DOM. So, I went looking for an equivalent to window.open() and came across the HtmlPage.PopupWindow() method.  If you’ll recall the javascript window.open() method is defined as such:

  1. window.open( [sURL] [, sName] [, sFeatures]);

The HtmlPage.PopupWindow() is defined as:

  1. HtmlPage.PopupWindow(string navigateToUri, string target, HtmlPopupWindowOptions options);


Perfect!  …or so I thought.  I fully expected that if I called PopupWindow() like this:

  1. HtmlPopupWindowOptions options = new HtmlPopupWindowOptions()
  2. {   
  3.     Directories = false,
  4.     Location = false,
  5.     Menubar = false,
  6.     Status = false,
  7.     Toolbar = false,
  8. };
  9.  
  10. HtmlPage.PopupWindow(new Uri("http://www.wintellect.com","_blank", options);

..that I’d get a new browser window with the default width/height on the monitor that the launching browser is on.

After all, if I called window.open() with equivalent arguments as follows that’s what would happen:

  1. string features = String.Format("directories=no,location=no,menubar=no,status=no,toolbar=no");
  2.  
  3. HtmlPage.Window.Navigate(new Uri("http://www.r2musings.com","_blank", features);

 
Instead, I get a small window that launches on Monitor 1.  I do my main work on my Monitor 2 and I kept waiting for my popup window only to realize that it was on the other monitor.  I really hate applications that do this!

Looking into Reflector, the issue seems to be that if options is passed as null in the last parameter of PopupWindow(), the call is simply forwarded to window.open().  But, if you pass an instance of HtmlPopupWindowOptions (even with no properties set) to PopupWindow(), the ToFeaturesString() that gets called to convert this strongly-typed version of the features to the string that is needed for window.open() is also changing the height/width/top/left of the popup window.

Looking over the documentation…yes, I’m male and sometimes do that *after* nothing else works. ….anyway, there it is in the remarks of HtmlPage.PopupWindow().  All the ugly details and the admission that my popup would be altered.  Documented or not, it’s not acceptable to my client and I’m not putting my name on anything that launches a browser on the wrong monitor!

That’s when I decided to have another look at HtmlWindow.Navigate() which seems to more accurately mirror the behavior that I would expect out of something that purports to wrap window.open().  Going this route, we lose the strong typing of the HtmlPopupWindowOptions, but in exchange we get exactly what we are expecting when calling window.open(). The call using HtmlWindow.Navigate() looks like this:

  1. string features = "directories=no,location=no,menubar=no,status=no,toolbar=no";
  2.  
  3. HtmlPage.Window.Navigate(new Uri("http://www.r2musings.com","_blank", features);

This will fire a new window on the correct monitor and will honor the default settings for width/height/top/left.

Here’s the code.

Here’s a live sample.

Posted in Silverlight, Silverlight 2 | Comments Off

Yngwie Malmsteen syndrome (Silverlight 2 Scroller revisited)

Earlier this month, I blogged about a Silverlight 2 Scroller control that I had labored over for the better part of a weekend.  The entire time I was working on this Scroller, I had this small, dirty feeling that what I had created was somehow way more than what I needed to accomplish my end goal.  But, time was short, it got the job done and I figured that I could always revisit it at some point.

Fast forward a few days as I was reading Shawn Wildermuth’s blog and I come across his post on the Silverlight ItemsControl and realized what that dirty feeling was all about.  I was exactly the guy he was talking about that was trying to bastardize the Silverlight ListBox into something else…namely the ItemsControl.  So, I revisited the Scroller and was able to remove about 50% or more of the code and still achieve my goal. No custom ListBox, etc.

I think it’s part of most any process, really.  As you work on making something better you tend to keep adding and adding more code until you reach a saturation point where you need to step back and just start removing things.

It made me think of so many guitarists in the 80′s that just kept adding and adding notes and playing faster and faster until the music just became guitar masturbation instead of anything musical.  (These guys wouldn’t have known a whole note if it hit them in the face). On the other hand, you take someone like David Gilmour that can play one note and absolutely convey way more than the shred monsters could ever muster.  It’s all part of the learning process.  There’s a curve graphed somewhere (I’m sure) that shows the guitarist’s ascension to knowing when NOT to play.

So, who is Yngwie Malmsteen and what does he have to do with this post?  You can find out more than you ever wanted to know about Yngwie here. Yngwie was the poster boy for never quite knowing when to stop adding notes and he flashed before my eyes when I looked back and my original Scroller code. Anyway, thanks Shawn for saving me from that fate.

The updated code is here

Here is the live demo.

I’ll leave the original code here in case you want to get it and make fun of me.

Posted in Silverlight, Silverlight 2 | Comments Off

Silverlight System.ExecutionEngineException

Just a quick note that will hopefully save someone the pain that I just went through chasing yet another exception in Silverlight with nothing to go on from Visual Studio. (I really hope that there is some better feedback coming on Silverlight applications when you hit a runtime error in the future).  Anyway, I was digging in my App.xaml today to do a bit of much-needed clean up and then started getting System.ExecutionEngineException being thrown at runtime.  I was just about to the point of pulling out WinDbg (see this post on that) and I decided that maybe Blend could help me out.  After all, it really does owe me one for all the times it wouldn’t load my xaml without telling me why.

So, I opened the project in Blend and sure enough, it gave me the old "Invalid XAML" message that I was expecting when I attempted to open my app.xaml.  However, it also gave me a bunch of errors about not finding properties from one of my styles. I took a wild shot and clicked the View XAML Code link that Blend offered.  It placed me on a style that I had added earlier and I immediately noticed that I had left off the TargetType attribute.  Adding this cured the problem.

And for those that just scan for the code…

Bad:

  1. <Style x:Key="MyButtonStyle">
  2.     <Setter Property="FontSize" Value="10" />
  3. </Style>

Good:

  1. <Style x:Key="MyButtonStyle" TargetType="Button">
  2.     <Setter Property="FontSize" Value="10" />
  3. </Style>

Posted in Silverlight, Silverlight 2 | Comments Off

Silverlight 2 Scroller

Last week I had opportunity to really dive into some fun with a Silverlight 2 ListBox. It all started with a requirement for a simple Scroller control.  You know, the simple left-to-right scrollers that you see in many applications?  I’ve seen them in several places, yet when I searched around for a Silverlight version that met my criteria I came up empty.  I have seen many great Image Carousel controls around, but overall the majority of them were not quite "calm enough" for a typical Line of Business application and I wasn’t really intending on using images only. There were some really great "pieces" that I found as I attempted to assemble this control and now that I have a functional version, I thought I’d share it with the community.

The first challenge here was that I needed to have two horizontal rows of items in the Scroller.  Thanks to a post over at The Problem Solver and the WrapPanel from the Silverlight Toolkit, I was able to pull this off pretty easily.  So, I went to work on a custom template for a ScrollBar.  My initial thought here was that I’d stretch the ScrollBar to the Height of the ListBox, delete the Thumb, make the Background Transparent, and delete the Large Increase/Decrease controls.  This worked great, but the scrolling was what you would typically get when clicking the Small Increase/Decrease portions of a ScrollBar (i.e. the little arrows).  What we really needed was for each click to move to the next/previous column of items.

At this point, I decided to lose the custom template for the ScrollBar and just go with a pair of RepeatButtons for the Previous/Next buttons so that I could have a little more control over things.  As I didn’t want to see the ScrollBar, I had to hide it by setting the HorizontalScrollBarVisibility and the VerticalScrollBarVisibility to Hidden in the ControlTemplate of the ListBox.

The ScrollViewer (that is part of our ListBox) is what we want to manipulate to give this per-item scroll experience to the user.  There are a couple of important properties of the ScrollViewer that we care about.  First, the ScrollableWidth which represents the width of the area that can be scrolled.  You can envision this as placing all of the columns end-to-end (including those that are scrolled out of sight) and getting the total width.  Secondly, the HorizontalOffset which is simply the indicator of the current scroll position (relative to the entire ScrollableWidth). Using these two properties and the ItemWidth, we can compute how far to move the ScrollViewer for each click of our Previous/Next buttons.

Since I needed direct access to the ScrollViewer in my ListBox and its not readily available from the default ListBox, I decided to create a custom control with a ScrollHost property.  I saw this little trick used in the ItemContainerGenerator class of the Silverlight Toolkit (which has some really great utility code along with the awesome controls….well worth your time to investigate that).  Also, since I was using a WrapPanel as my ItemsPanelTemplate and I needed the ItemWidth for my calculations and since WrapPanel just happens to have an ItemWidth property, I decided to expose that as a property as well.
I overrode the PrepareContainerForItemOverride() method in my custom ScrollerListBox in order to set these properties.  This worked pretty well and with a little math and a call to ScrollViewer.ScrollToHorizontalOffset(),  I was able to create the scrolling behavior that I needed.

But….wouldn’t it be cool if the scrolling was animated?  …it is Silverlight after all and every demo that I’ve ever seen at a conference with Silverlight has animation.  This proved to be a little more difficult as you can’t directly animate HorizontalOffset.  While searching for a way to solve that, I came across a really great solution on Rob’s Usability Development blog for creating an AnimationHelperControl to give you something to animate.  His post also made use of his excellent AnimateTo extension methods that he describes in another post.

As I didn’t want to hard code the amount of time it took to animate the scroll, I added a ScrollTime Dependency Property to the ScrollerControl and was able to set that declaratively in my Page.Xaml. 

I think the final result gives a nice subtle use of animation that doesn’t distract the user from their data. (As an aside…for a REALLY nice usage of animation in a Silverlight application, check out the one that Billy Hollis shows in this video on dnrTV).

My demo uses employees that I’ve generated in a TestData class and then binds the various fields to the ItemTemplate of my ListBox using standard Silverlight DataBinding. I was a bit too lazy to create a separate image for each of my employees, so I used the same image for each.  These images could just as easily be streamed from the database, but that’s a different post.

Here is the live demo.

Here is the project source.

I have a few more ideas for the ScrollerControl such as the ability to drag between the items (sort of like the iPhone).  Anyway, I’ll post those as I implement them.

Posted in Silverlight, Silverlight 2 | Comments Off

Initializing the FROM value of a Silverlight 2 Animation

Recently, I was attempting to create my own popup dialog. I had specific requirements in mind for this dialog, including:

  1. I wanted to animate the Width/Height from 0×0 to the ActualWidth/ActualHeight
  2. I wanted to animate the Opacity from 0 to 1
  3. I wanted to animate the Top/Left properties from the point of mouse click (an icon
    in my case) to the center of the screen and back to the original point of mouse click
    when the user closed the dialog

All of these are fairly easy to accomplish using a Storyboard with an x:Name specified. In the case of my requirement #3 above, I merely needed to set the From value of my animation and call the Begin()method, like so (for purposes of illustration, I’ll confine this to the Canvas.Left property only…you can apply the same logic to the Canvas.Top property and it’s all in the accompanying project):

  1. <Storyboard x:Name="MoveDialogStoryboard">
  2.     <DoubleAnimation
  3.         x:Name="theDialogAnimation"
  4.         Storyboard.TargetName="theDialog"  
  5.         Storyboard.TargetProperty="(Canvas.Left)"
  6.         To="0" Duration="0:0:0.5" />
  7. </Storyboard>


  1. // this value would actually come from getting the mouse position via GetPosition()
  2. theDialogAnimation.From = 800;   
  3.  
  4. (MoveDialogStoryboard as Storyboard).Begin();

This all works as you would expect.  However, I really liked the idea of isolating all of my dialog states into one place and the Visual State Manager sounded like the perfect solution…that is, until I tried to set the FROM value programmatically and got hit with a NullReferenceException every time I tried to reference my named Animation.

I tried several things and ended up posting my issue to the Silverlight forum where Shawn Wildermuth was kind enough to offer a solution.  Shawn’s solution was to simply set the property to the value before calling GoToState() in my code. This made perfect sense and I ran off to give it a try.  It worked…once. My animation would fire once but then appear to be swallowed or ignored on subsequent clicks.  After further investigation, this turned out to be an artifact of the fact that I was never setting my VisualState back to the original state…something you don’t have to do when using a Storyboard outside of the Visual State Manager. So, that fixed that issue and Shawn’s solution worked.  However, I didn’t really see any way using this solution to animate back to the original point of mouse click.

Either way, it didn’t really satisfy my initial curiosity for WHY I couldn’t programmatically set the FROM value when my animation was inside a Visual State Manager, so I pressed on.  Thanks to a couple of blog posts (here and here) and some pretty ugly LINQ, I was finally able to programmatically set the FROM value and have it animate my dialog from the original point of mouse click with a Storyboard inside of a VisualState like so:

  1. public void ShowDialog(Point startingPosition)
  2. {
  3.      Storyboard storyboard = Utils.FindStoryboard(LayoutRoot, "DialogStates", "Open");
  4.      (storyboard.Children[0] as DoubleAnimation).From = startingPosition.X;
  5.      (storyboard.Children[1] as DoubleAnimation).From = startingPosition.Y;
  6.      VisualStateManager.GoToState(this, "Open", true);
  7. }
  8. // This is the definition of the extension method FindStoryboard() shown
  9. //    above (which is where the real work happens)
  10. public static Storyboard FindStoryboard(this FrameworkElement parent,
  11.                                         string groupName, string stateName)
  12. {
  13.      VisualState visualState = VisualStateManager.GetVisualStateGroups(parent)
  14.          .Cast<VisualStateGroup>().Where(group => group.Name == groupName)
  15.          .SingleOrDefault()
  16.          .States.Cast<VisualState>()
  17.          .Where(state => state.Name == stateName)
  18.          .SingleOrDefault();
  19.  
  20.      if (visualState != null)
  21.          return visualState.Storyboard;     
  22.  
  23.      return null;     
  24. }

All of that being said, I didn’t end up going this route nor do I recommend it. It’s way too brittle and just plain ugly in my opinion.  In the end, I chose to create my Open and Closed Storyboard animations for my popup dialog as standard Resource Storyboards where I don’t have to reset the State before calling and I don’t have to jump through hoops to set the value and, most importantly, I can set a name for the Animation and directly set the property value.  For the actual "modes" of my dialog (assuming there are multiple views for the dialog), I used the VSM to represent things like EntryView, EditView, etc.  I think this offers a much cleaner solution.

I’ve put together a quick demo to illustrate both calling the Storyboard directly and using a Storyboard in a VSM. 

The live version is here and the project source is available here.

Posted in Silverlight, Silverlight 2 | Comments Off

Photosynth

For those that missed the announcement last week, PhotoSynth is live and after a pretty bumpy start looks like you can at least play around with it now.  I’ve managed to load two of my sets of photos from a trip to the High Sierras a couple of years ago.  It definitely still has its bumps as I had to cancel and restart the synth several times as it would hang indefinitely.  I didn’t get really high "synthy" scores as I wasn’t taking the photos with PhotoSynth in mind at the time.  However, the PhotoSynth team has supplied a document of points to keep in mind while shooting photos if you intend to make a PhotoSynth out of them.  I can’t wait to try it out when I actually shot the photos for synthing. There are numerous really great examples on the PhotoSynth site, including some shot by the National Geographic Society photographers.  I like that you can go full screen (or full browser) as that really helps make the experience a bit more of an immersive experience.  Also, the slide show and thumbnails really help as well.

PhotoSynth is now giving 20GB (!) for free to anyone to try PhotoSynth.  It takes a LONG time to use 20GB in JPEGS!  Give it a try.

Since my photos didn’t all relate to one another, PhotoSynth sort of creates mini-PhotoSynths inside each.  You’ll want to check the thumbnails page to see the various scenes that it stitched together.

Here are links to my first two:

High Sierras – Dana Plateau

High Sierras – Saddlebag Lake Area

Posted in Uncategorized | Comments Off

devLink Conference

This past weekend a few of us Wintellectuals made the trek Atlanta to Murfreesboro TN to present at the annual devLink conference. I really can’t say enough about the level of professionalism and obvious preparation that went into devLinkJohn Kellar, Tommy Norman, and Leanna Baker and the entire team that made it happen are well deserving of accolades for their accomplishment.  The conference was held on the campus of Middle Tennessee State University which was also perfectly suited for the task. All of the rooms were nice, large, and well-equipped (even though said equipment was apparently timed to shut off exactly at the 1-1/2 presentation mark).  As a vegetarian, I can’t say too much for the food, but that’s pretty much on par with any gathering…I’ve learned to carry plenty or protein bars over the years. Bottom line, for $50 this absolutely has to be best value for your buck in training (other than Wintellect’s DevScovery,of course *smile*).

While my colleagues, Steve Porter and Keith Rome, offered four really great talks on Silverlight topics,
I was there to present on all the new things available with Cascading Style Sheets (sarcasm off).  Actually, my CSS talk went really well and I received lots of good feedback which I’ll continue to roll into that presentation.  All sarcasm aside, most web developers (especially those in Enterprise positions) are stuck with CSS for the foreseeable future and this presentation really aims to go through the major areas where I see developers struggling and try and cast some light on how all those pieces play together.  Thanks to all that made it to the talk (standing room only!) and for the emails that I’ve received since.

I’ve updated the slides and code with this past weekend’s revisions and you can get it here:

CSS Deep Dive for the ASP.NET Developer

I believe that the other presentations will be posted on the devLink website, so keep an eye out for them.  There were a lot of good ones!

Posted in CSS, Presentations | Comments Off

Updated Deep Dive CSS code

Thanks to all the folks that came to my Deep Dive CSS for the ASP.NET Developer session at this past weekend’s Atlanta Code Camp.  I got some really great feedback from the evaluations and will definitely
incorporate some suggestions into this presentation in the future. The abstract, updated code and slides are available here:

DeepDive CSS for the ASP.NET Developer


Posted in CSS, Presentations, Visual Studio 2008 | Comments Off

Top-10 Application-Design Mistakes

We saw it when the world first discovered Flash and I’m sure we’ve got a lot of it left to live through with Silverlight, so this is pretty timely advice from the "Godfather of Web Usability" himself, Jakob Nielsen.  This should be required for every web developer.  There are some great links within the post as well, so be sure to click around.

Top-10 Application-Design Mistakes

Posted in Silverlight, UI and Usability | Comments Off